Have you tried DxO Photolab yet?
Back in late October I asked the question “Is it worth upgrading to On1 Photo RAW 2023?” and came to the conclusion that at least in my case the answer was no.
More recently I asked myself a similar question – what are the reasons to try DxO Photolab 6?
After downloading the free trial my initial reaction was there are no good reasons! I would stick with DxO Photolab 4 and the Nik Collection. With that combination, I can do almost 99% of what I want to do.
But then I started playing with the new Control Line local adjustment and the revamped U-Point technology in Photolab 6…and changed my mind…
So a month ago I dug out my hot-from-overuse credit card and went online to buy Photolab 6. And I’m loving it!
At its heart DxO Photolab is, and always has been, a very effective and, I find, easy-to-use photo browser, raw processor and non-destructive editor. The latest release, Photolab 6, brings with it a whole host of new features – and upgrades to existing features.
But before I go any further I would ask you to bear in mind that this is not a full review of DxO Photolab 6 – I’ll leave that to the experts.
What you’ll read here is merely a collection of my thoughts after using the package for a month or so.
So now here are 5 good reasons to try DxO Photolab 6.
- Automatic correction for optical defects in lens/camera combinations;
- Clearview;
- Smart lighting;
- The new Control Line local adjustment feature – and updated U-point technology;
- DeepPrime XD processing.
1. Automatic lens corrections
Unlike some photo processing packages, there is nothing hit and miss about the optical corrections Photolab applies to images.
DxO tests thousands of lens and camera combinations, and the results of those tests are incorporated into Photolab by way of downloaded and installed DxO Optics Modules. This can be set up to happen automatically for new lens/camera combinations detected by Photolab.
Not only are lens distortions including vignetting automatically corrected, but the correct degree of sharpening is applied, again based on the lens profile. Unlike other packages, different degrees of sharpness are applied across an image based on information contained within the appropriate DxO Optics Module. It is really quite impressive, and very noticeable in most instances.
In fact, the correction can be so good that I have decided that I don’t need to upgrade to new glass as my Lumix 12-60mm kit lens can be made to look so much better with Photolab 6.


2. Clearview
DxO’s Clearview is, I guess, what other photo processing apps refer to as Haze or Dehaze functions.
I have no idea how the AI algorithm for Clearview works but it does – work, that is!
DxO describe Clearview thus – “Clearview automatically analyzes the image, reducing haze and recovering contrast and detail”.
Other users/photographers more experienced than me also claim that Clearview is a great tool for adding a dramatic atmosphere to portraits.


In the above example, Clearview was set at the 50% slider setting with no other adjustments applied to the image.
3. Smart Lighting
The Smart Lighting feature, when applied, gives a good starting point for getting brightness across an image correct – or the way you want it.
I think Smart Lighting was originally conceived a tool to automatically detect faces in a portrait and adjust the lighting to bring out facial details. But it turns out to be a much more useful tool than that by also offering a “spot weighting” selection option.
In my view this is such a basic feature that its usefulness is easily overlooked. It is a try-it-and-see feature that, like Clearview, doesn’t necessarily resolve all lighting/brightness issues with all images.
4. Control Line local adjustment
My goodness – a whole story could be written about the Control Line local adjustment which first showed up in Photolab 5.
This really should top my list of reasons to try DxO Photolab 6!
It’s sort of like a gradient local adjustment – but different – and somewhat difficult to explain.
When using a Graduated Filter in Photolab, any adjustments made within the filter affect the whole area equally. However, a Control Line provides the option to make adjustments selectively based on the chroma (colour saturation) and luma (brightness) of specific areas.
DxO call this Mask Selectivity.
It took me a while to get my head around it, but I have discovered that a Control Line local adjustment is great for images that don’t have a flat, even horizon, and is a very powerful tool.


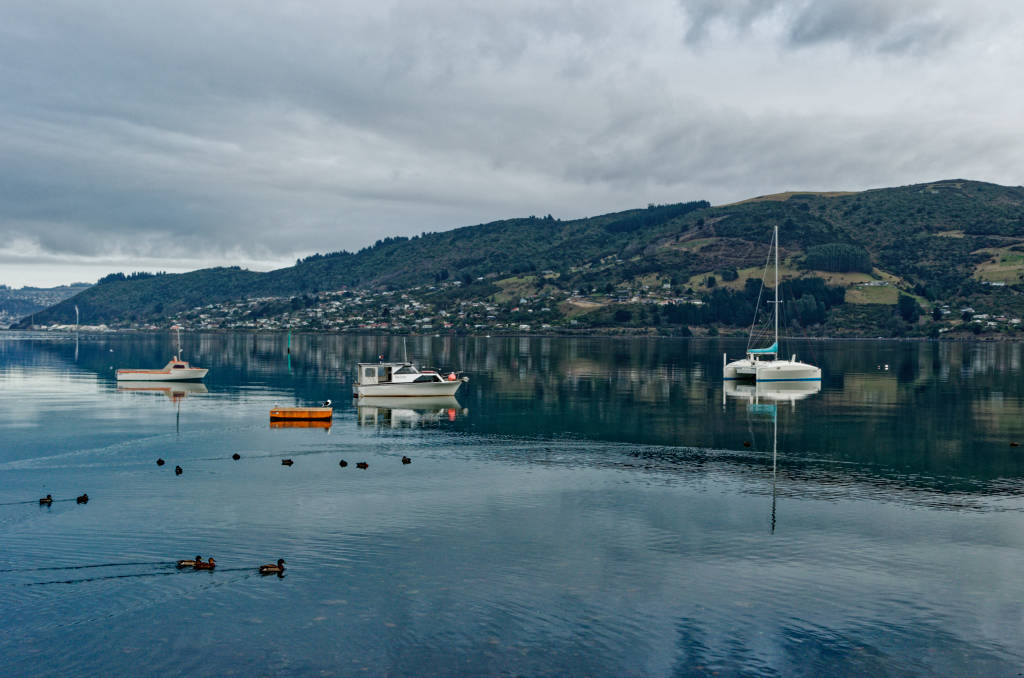
A Control Line was used along the “horizon” of the mountain range to more clearly isolate the line of the hilltops against the sky.
Using the Mask Selectivity options, areas along and within the control line area of effectiveness were masked based on chroma and luma.
Obviously, the “after” image has been converted to black and white (using Nik Silver Efex Pro) but you can see how the line of the hilltops is more defined.
The image below is not a Control Line used on the above photo, but I hope it gives some idea of how the Mask Selectivity works.

The bright areas in the lower half of the image are rocks in the sea selected using luma/chroma adjustment., allowing changes to be made to only the “selected” areas.
The updated U-point technology works in a very similar fashion using the Mask Selectivity option.
Incidentally, Control Linesd can be used within Control Lines, just as Control Points can be used within other Control Points.
5. DeepPRIME XD
The noise reduction options offered by DxO Photolab 6 are fantastic.
Basic noise reduction is High Quality, next up is PRIME, then DeepPRIME, and the top-of-the-line noise processing is, I guess Photolab 6’s jewel in the crown – DeepPRIME XD. The XD in DeepPRIME XD stands for extra detail.
DeepPRIME XD is not your day-to-day noise reduction. I use it only for the occasional high-ISO images that I shoot.
Take a look at this before-after example.
This cropped photo – zoomed in to 200% – of a New Orleans mounted policeman was taken at night at ISO 3200 on my previous camera – a Nikon D5100 – notorious for poor high-ISO images.
On the left is the original NEF file, and on the right is the TIFF produced by DeepPRIME XD.


DeepPRIME XD has certainly really cleaned up an otherwise noisy image. Sure, it’s not perfect – but certainly good enough to turn bad images into keepers.
Be aware though – DeepPRIME XD processing can be slow. It certainly is my computer. It takes about 1 minute 30 seconds to process a raw file to a TIFF – but it is still way up there as one of the reasons to try DxO Photolab.
So there are. My 5 top reasons to try DxO Photolab 6.
Of course there are many more great reasons to try DxO Photolab 6:
- Top notch raw processing
- Improved image organisation and keywords
- Easy-to-use customisable interface
- Improved retouching tool
- Slick interface with the Nik Collection
- Instant watermarking
- No subscription – you own the package
- And so it goes on…
There is one thing to remember though – and that is that many of the features – e.g. DeepPRIME and XD, Clearview, Instant Watermarking, etc are only available in the Elite version.
Try DxO Photolab 6 if you haven’t already done so. Get a free 30 day trial.
And – no – I don’t get any kickback for expressing my opinion here.
There is only one reason why to stay away for good.
1) if you are a windows user, history of your work does not retain at all. Once you close application, all your work is gone.
Oh my goodness John – you are absolutely right. I have never noticed that before…but then from my “amateur/hobby” perspective, it is no big deal, and I love Photolab 6 for all the good reasons…. Thanks for your comments. Cheers. Rick